

How to Wind a Bobbin
How to Wind a Bobbin
Using sewing machines might be a much quicker and easier way to sew, but before getting too carried away, it is important that you know how to wind a bobbin. Once you’ve chosen a thread for your project, you need to wind this onto the bobbin before you can get on with your project. Sewing machines might differ by brand, but all things considered, winding a bobbin is essentially the same regardless of brand or model.
What is a bobbin?
A bobbin is the round object (that looks a bit like a wheel!) that the thread is spun around. The bobbin holds the thread that stitches the bottom side of the fabric. The bobbin’s sole purpose is to hold the thread below the needle.
The bobbin is one of the most important parts of a sewing machine, without this, you technically cannot sew.
Different sewing machines may require different types or sizes of bobbin, so if you are looking to purchase new ones, it is important to make sure you are picking the right bobbins for your specific sewing machine.
Before getting started
Before jumping straight into trying to wind the bobbin, take the time to get set up and ready to go. Make sure that you:
- Set up the sewing machine on the table in front of you, and turn it on so you have both power and light
- Have the instruction manual or quick start guide ready to refer to as needed. If you can't find it, most manufacturers will have their guides available online
- Have a spool of thread, at least one bobbin and scissors ready to go
Identify crucial machine parts
Using the illustrations in the manual as reference, locate the spool pin, bobbin winding tension disk, thread guide, bobbin winding spindle, bobbin winding stopper and the handwheel (sometimes called the flywheel). For most sewing machines, the parts needed to wind a bobbin will be located on the top of the machine.
Winding a bobbin
The majority of sewing machines wind bobbins in a similar way, however it is important to refer to the illustration manual or quick start guide of your sewing machine to make sure you are doing it correctly. The following illustrations are for Brothers LX17 sewing machine, other machines may vary.
Step 1Fully pull up the spool pin and put a spool of thread on the pin. |
 |
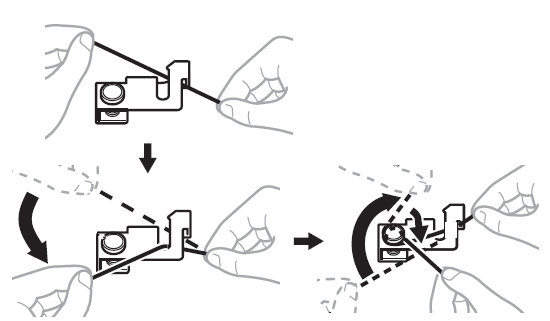
Step 2While holding the thread from the spool with your right hand, pass the thread towards you and into the groove on the thread guide. Pass the thread around the pre-tension disk, and pull the thread in completely. Make sure that the spool is in the correct position. If the spool is in the wrong place or set incorrectly, the thread may tangle. |
|
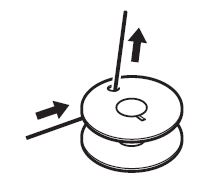
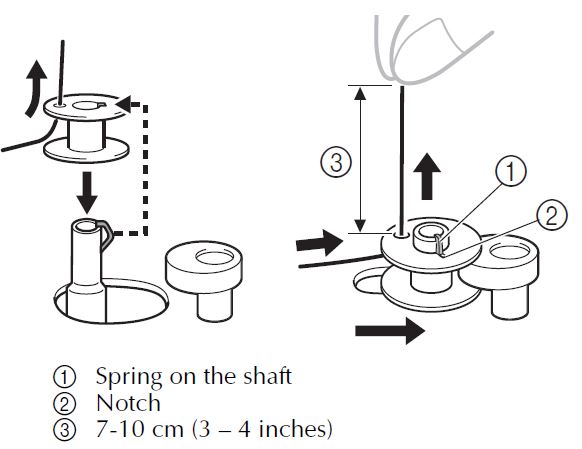
Step 3Pass the end of the thread through the hole on the bobbin from the inside. |
|
Step 4Put the bobbin on the bobbin winder shaft, and slide the bobbin winder shaft to the right. Turn the bobbin clockwise, by hand, until the spring on the shaft slides into the notch of the bobbin. Pull the thread taut and hold the end of the thread straight up. If the thread is too short, not pulled taut or held at an angle, injuries may occur when the thread is wound around the bobbin. |
|
Step 5Turn on the machine. |
|
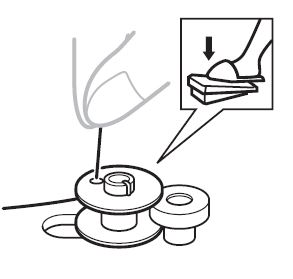
Step 6Whilst holding the end of the thread, gently press the foot controller to wind the thread around the bobbin a few times, then stop the machine. |
|
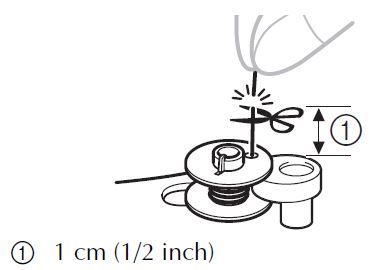
Step 7Trim the excess thread above the bobbin, leaving around 1cm (half an inch) of thread from the hole on the bobbin. Make sure that you carefully follow the manufacturer’s instructions for this step. If the excess thread is not cut away completely, it may tangle around the bobbin and cause the needle to break. |
|
Step 8Carefully press the foot controller to wind the bobbin. Step 9Once the bobbin seems full and starts spinning slowly, take your foot off the foot controller. Step 10Cut the thread, slide the bobbin winder shaft to the left and remove the bobbin. |
|


 Item Successfully Added